Wiki – Introduction
ConnectOS’ Wiki is like an in-house Lexikon. It stores information that is easily accessible and can be shared quickly at any time. Like with many other modules, it can be set who is allowed access to which type of information within the Wiki.
subtitles for this video will be available soon
1.
1. Where and how to create a Wiki-entry
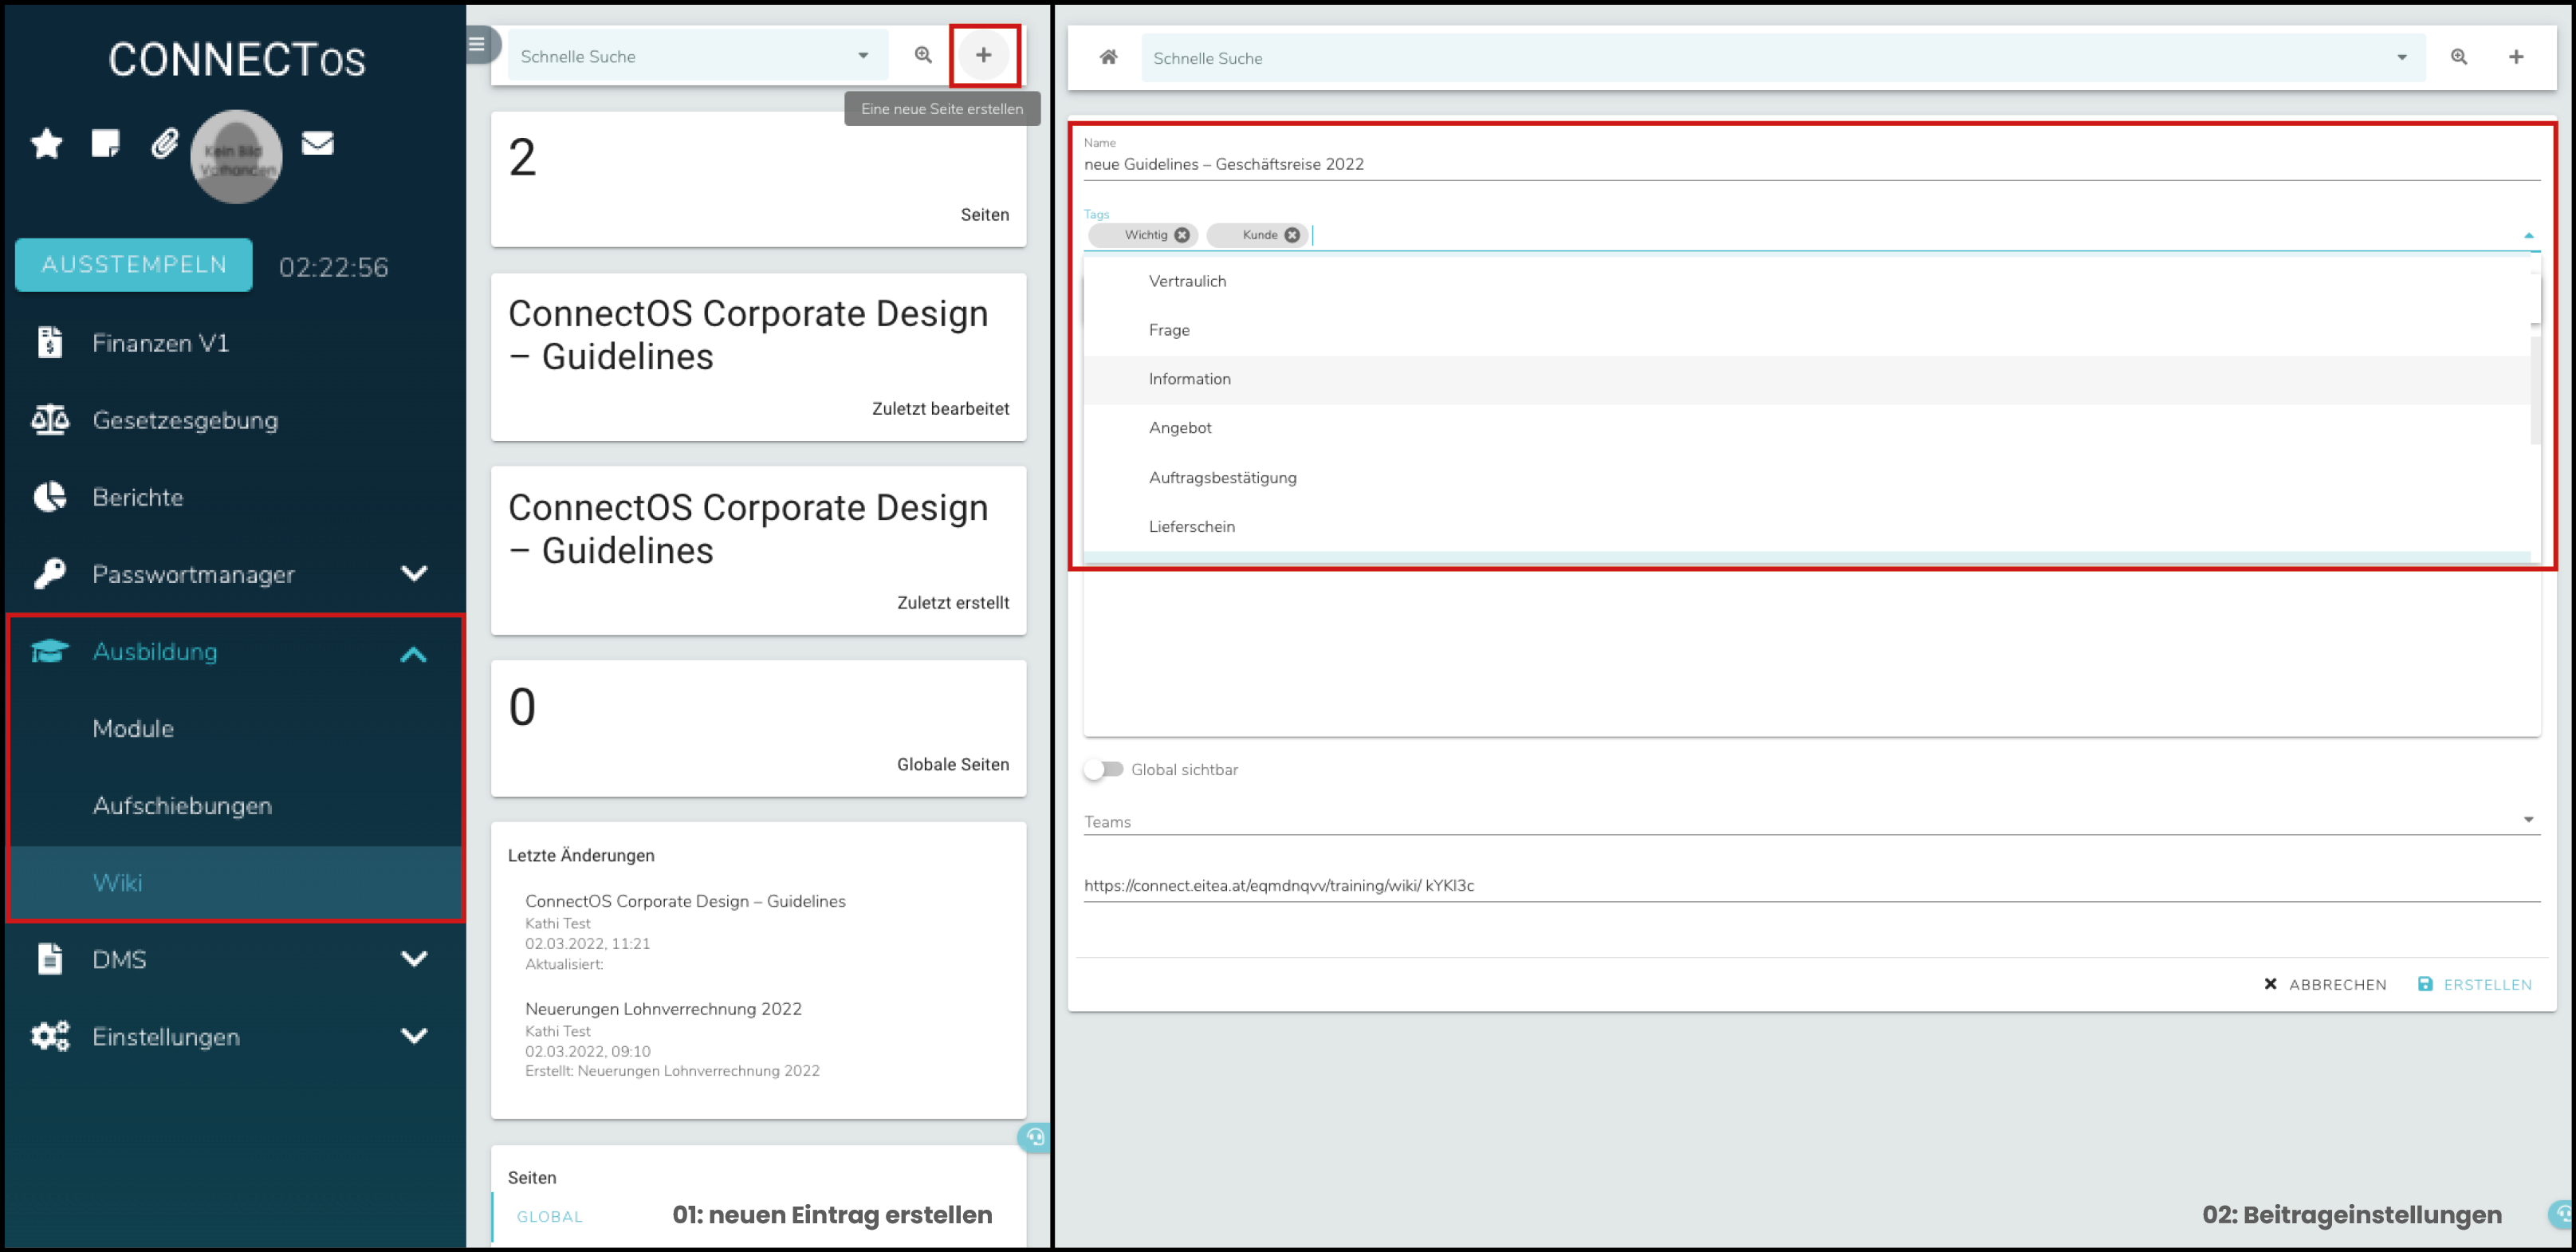
ConnectOS’ Wiki can be found in the left menu bar under the category training. When opened, the first thing shown is the Wiki overview. From there a new Wiki entry can easily be created by simply clicking + in the menu bar in the top right corner.
In the newly opened window a list of options is available. It offer as much individuality as possible when creating a new entry. The first thing to consider is a name for the Wiki entry so it can be recognized and found when searched later on. With the help of tags the post can be categorized depending on its relevance for the different company departments or other categories. Such tag could be something like marketing, question, important, etc. Of course it is possible to assign multiple tags to an entry. So individual posts about a specific topic can be easily found.
2.
2. text box options and appendix
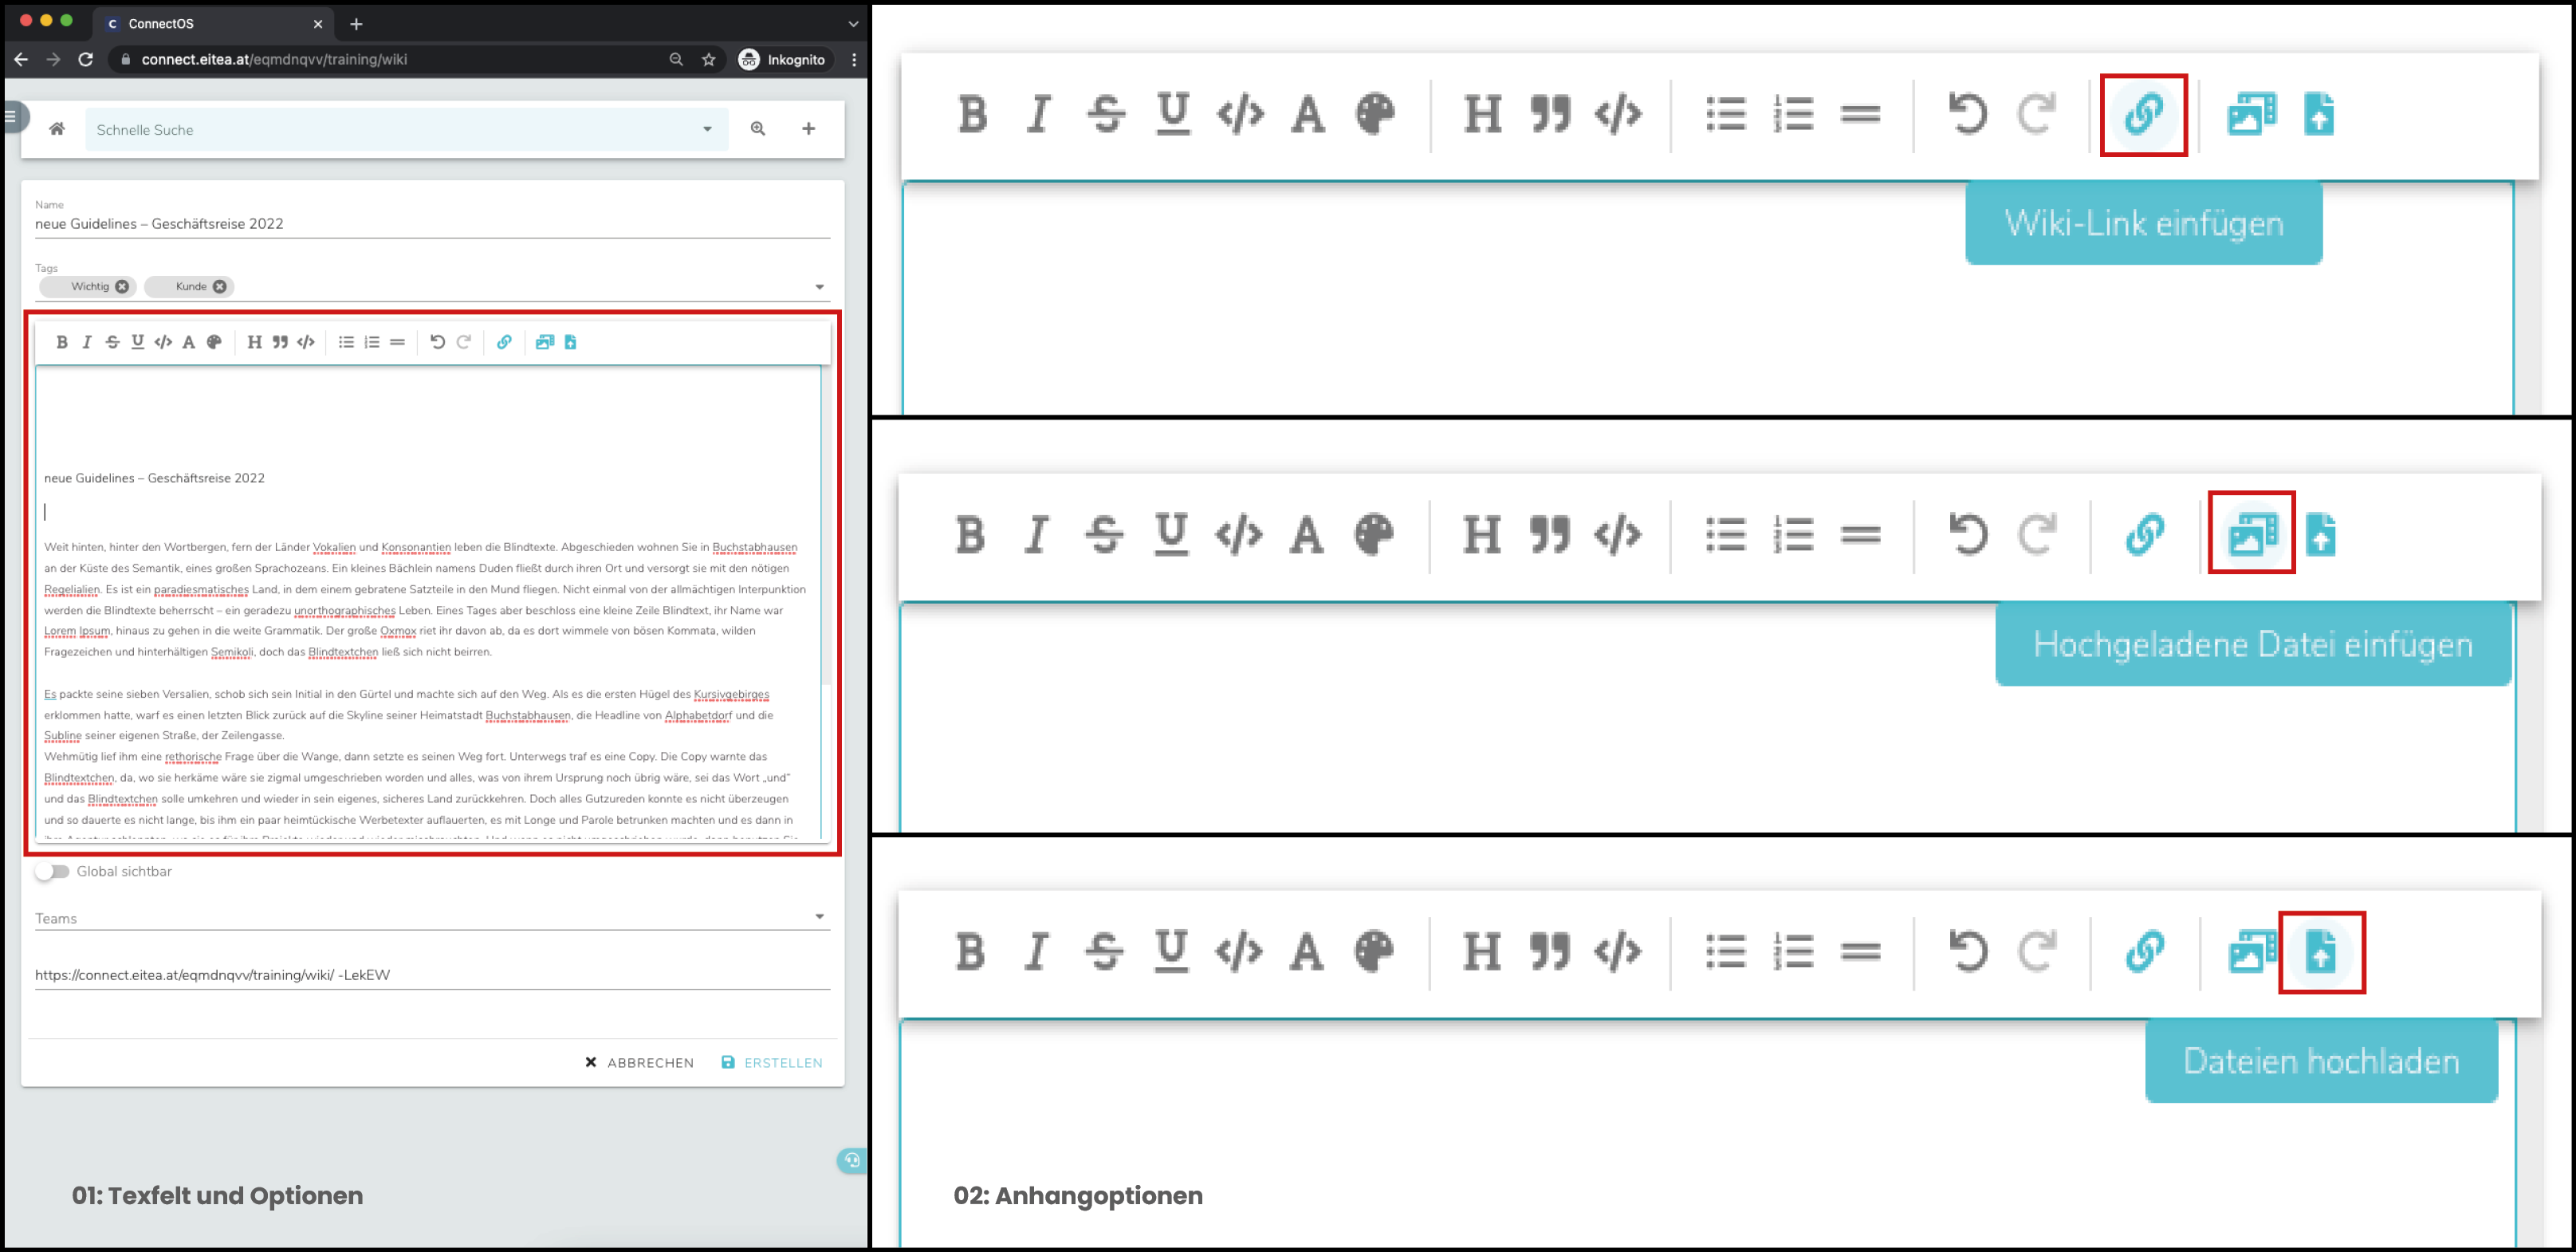
Of course it is possible to write a text as a Wiki entry. Therefore a text box is provided that offers many different settings like markup, color selection, code elements, and more. There is also the option to add an additional data file to the text. With you can add a Wiki link, with you can add an already uploaded document or with you can upload a document right away.
3.
3. accessibility
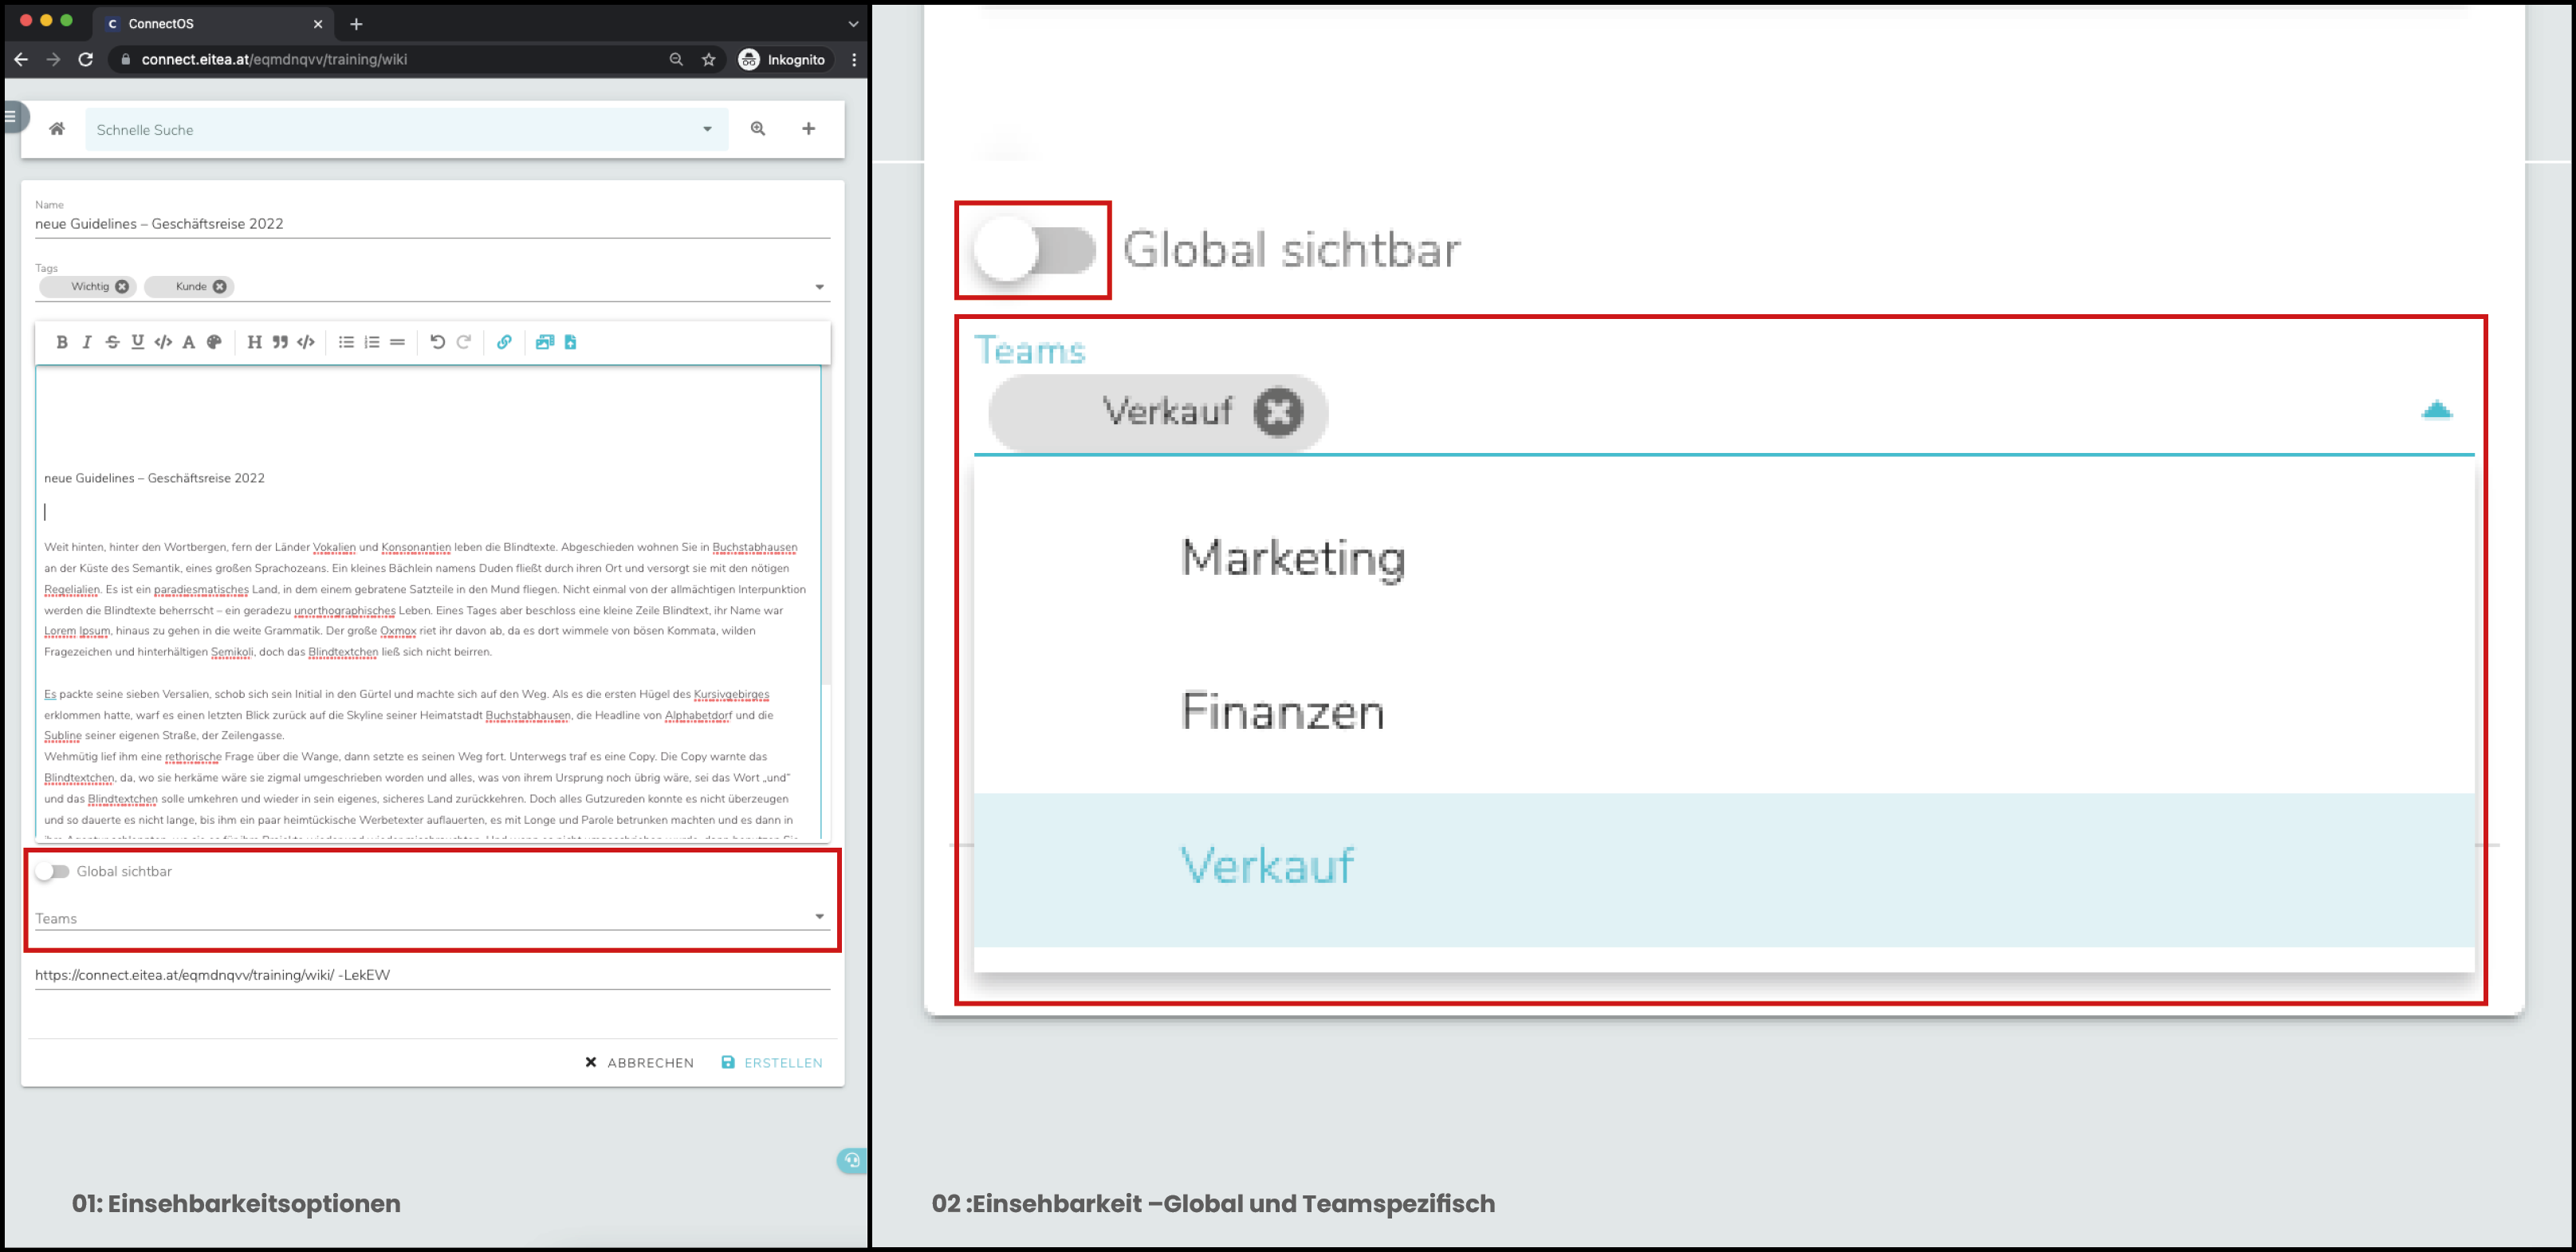
Like with other modules in ConnectOS it is possible to define to what Wiki articles certain employees or teams have access to. By activating the option global visibility, the entry can be seen by everyone. Right underneath the global visibility option the option teams can be found, with which can be specified which team has access to this particular Wiki post. Of course more than just one team can be allowed access.
When all essential options are set, the Wiki entry can be saved by clicking CREATE.
4.
4. Wiki overview and search options
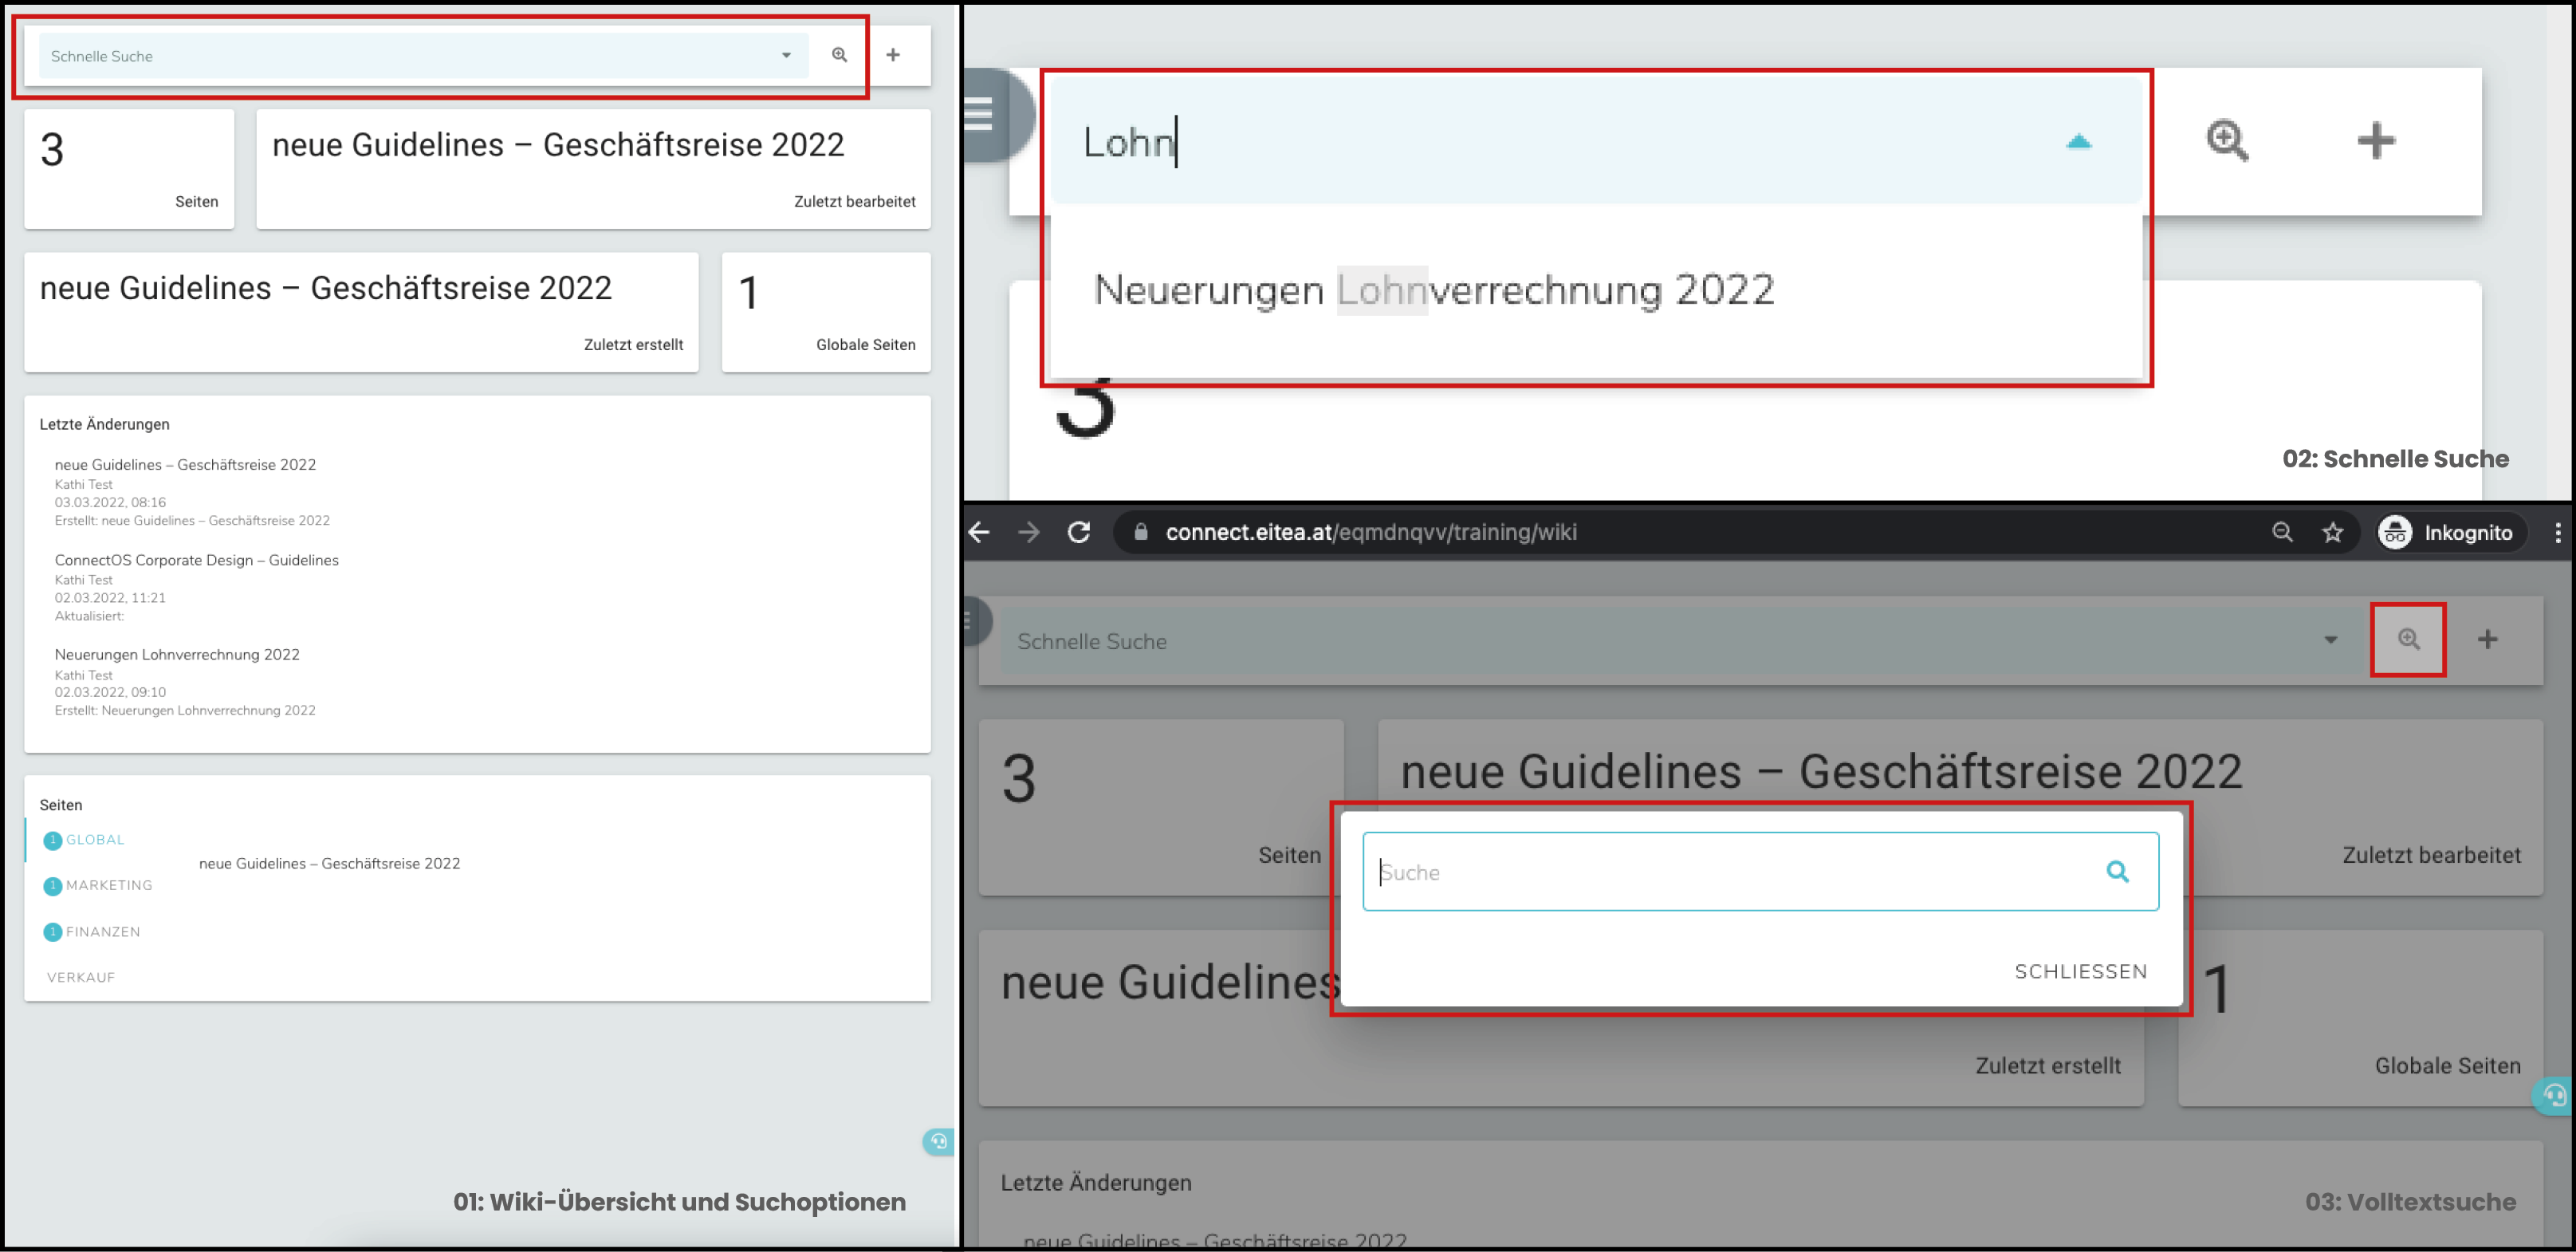
By looking at the overview page of ConnectOS’ Wiki already a lot of information about its content can be gathered. It is shown how many pages and how many global pages exist and which articles were created or worked on last. In addition to that it can be seen at one glance how many entries are relevant for each individual team.
If you want to search for a specific post you can do that by using the input field in the upper menu bar – the so called fast search. If you want to search for a post only knowing a key word that is (a significant) part of an entry’s text, you can use the full-text search, which can also be found in the menu bar in the top right corner.
5.
5. clipboard and belated editing
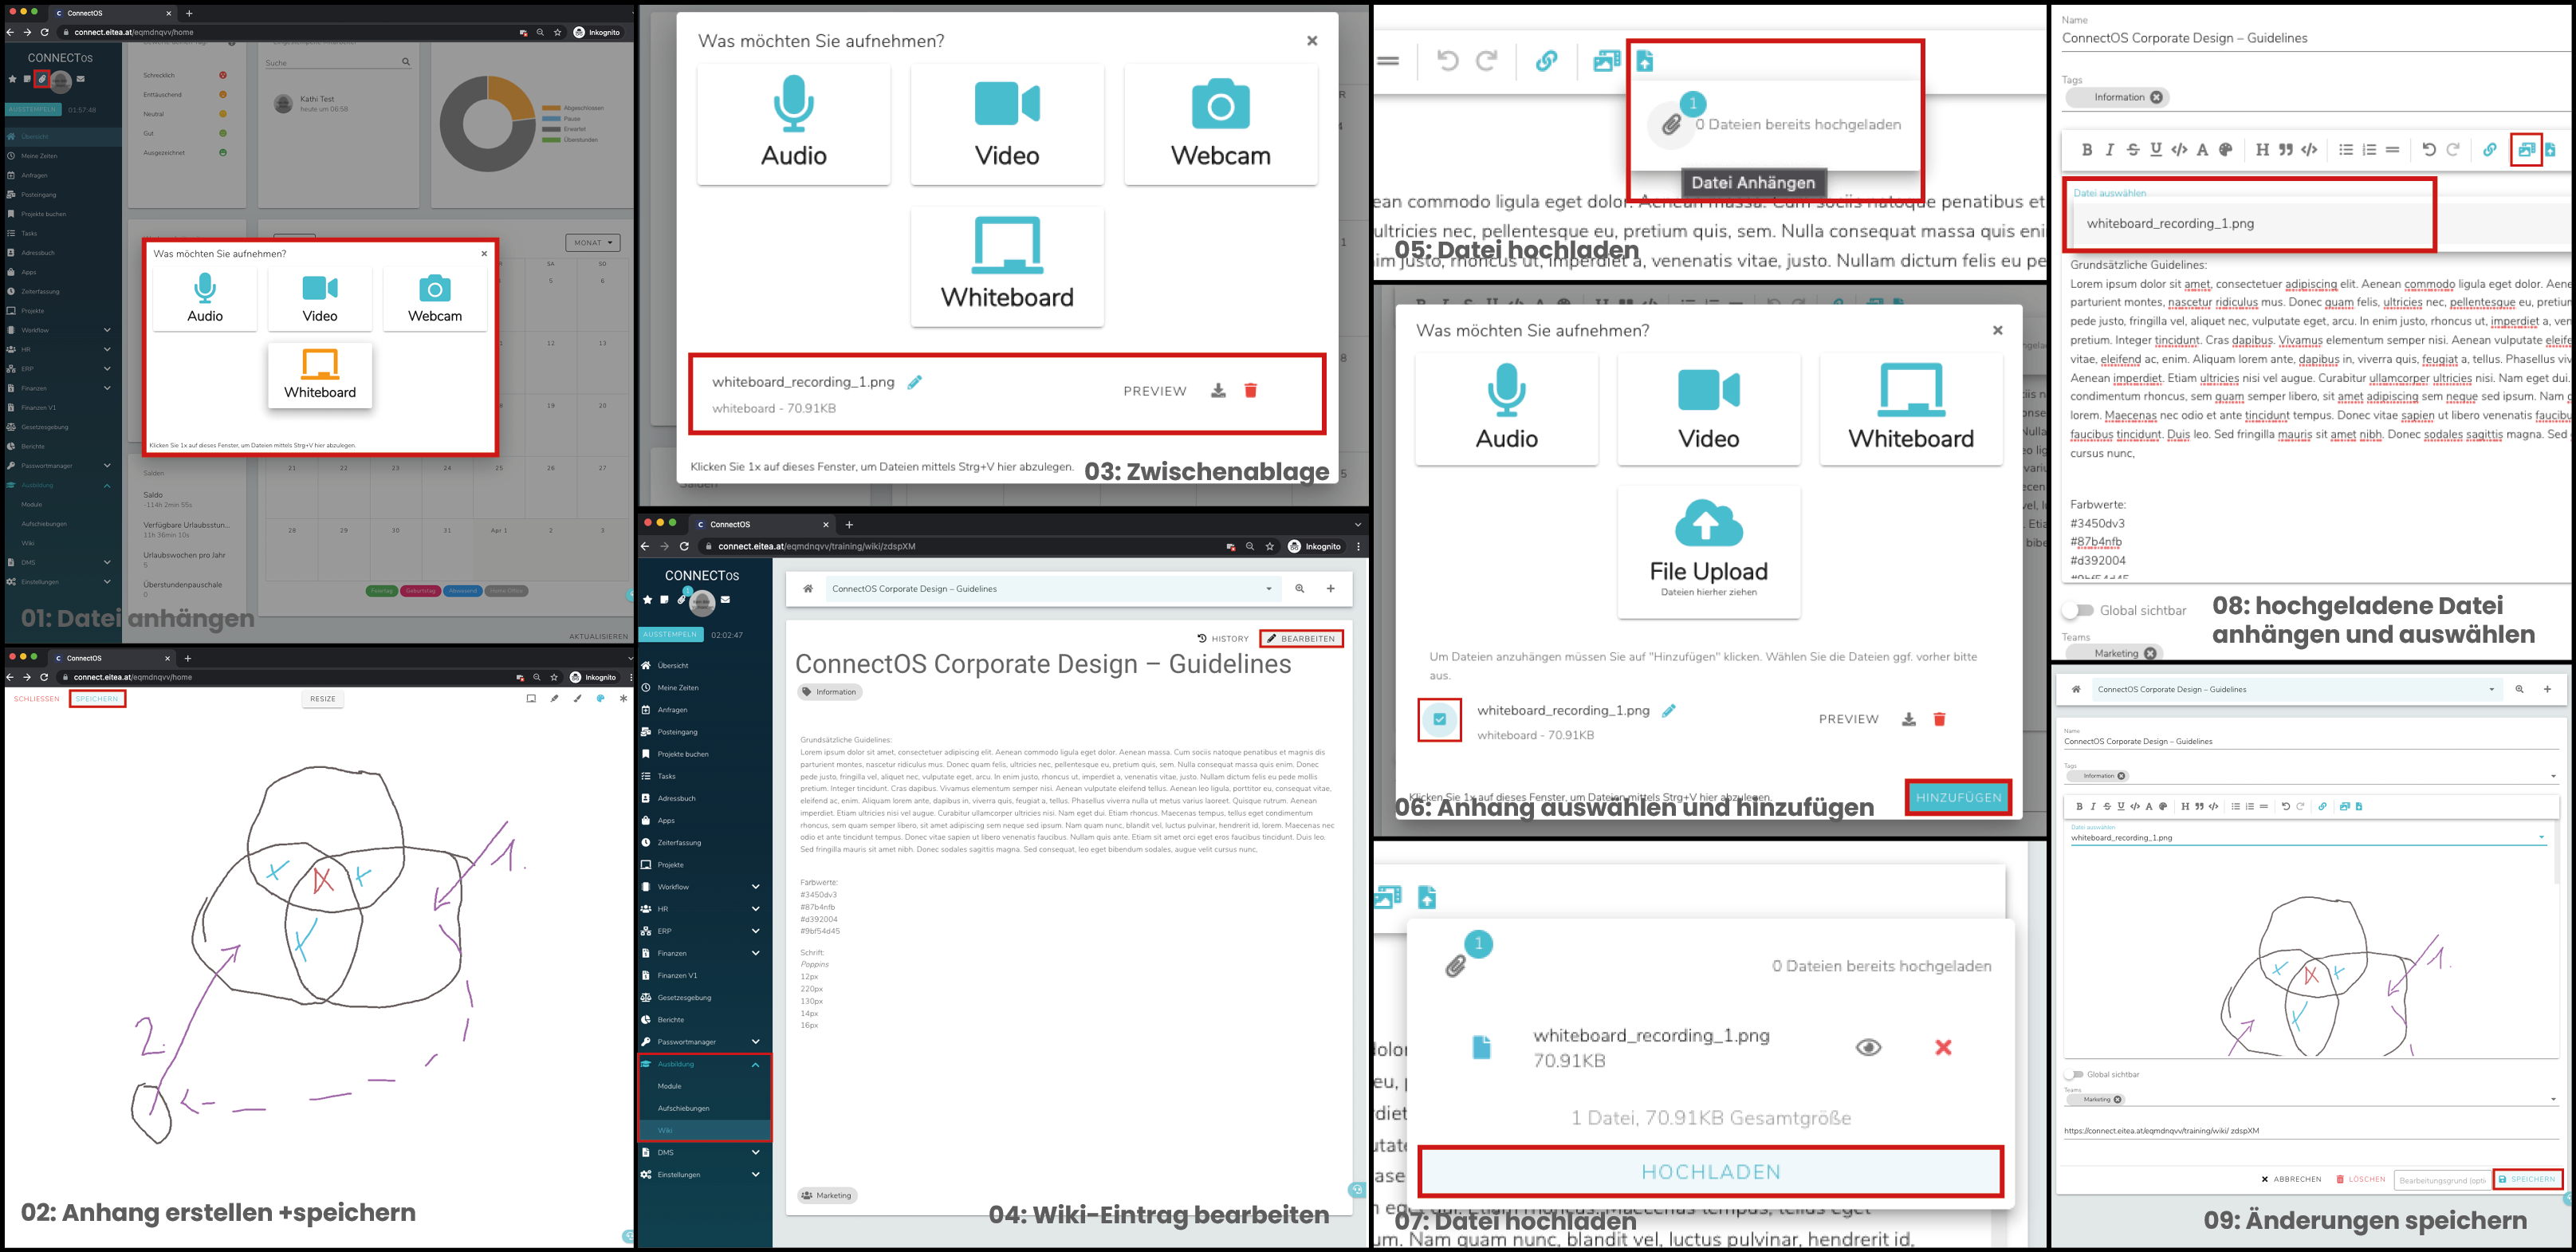
An other important function in ConnectOS that has great relevance (even though unrelated to the Wiki), is that can be found at the top of the left menu bar. It can be used to create new documents and save them in the clipboard of ConnectOS. For example, if you want to add a webcam video for better explanation to a Wiki-post after some time, you can do that by choosing an article and clicking edit in the top right. So the Wiki entry options can be opened again. From there the webcam video that is saved in the clipboard can be added to the article like it is shown above (step two). Of course it is possible to add a document from your clipboard when creating a new post too.
6.
6. Wiki authority
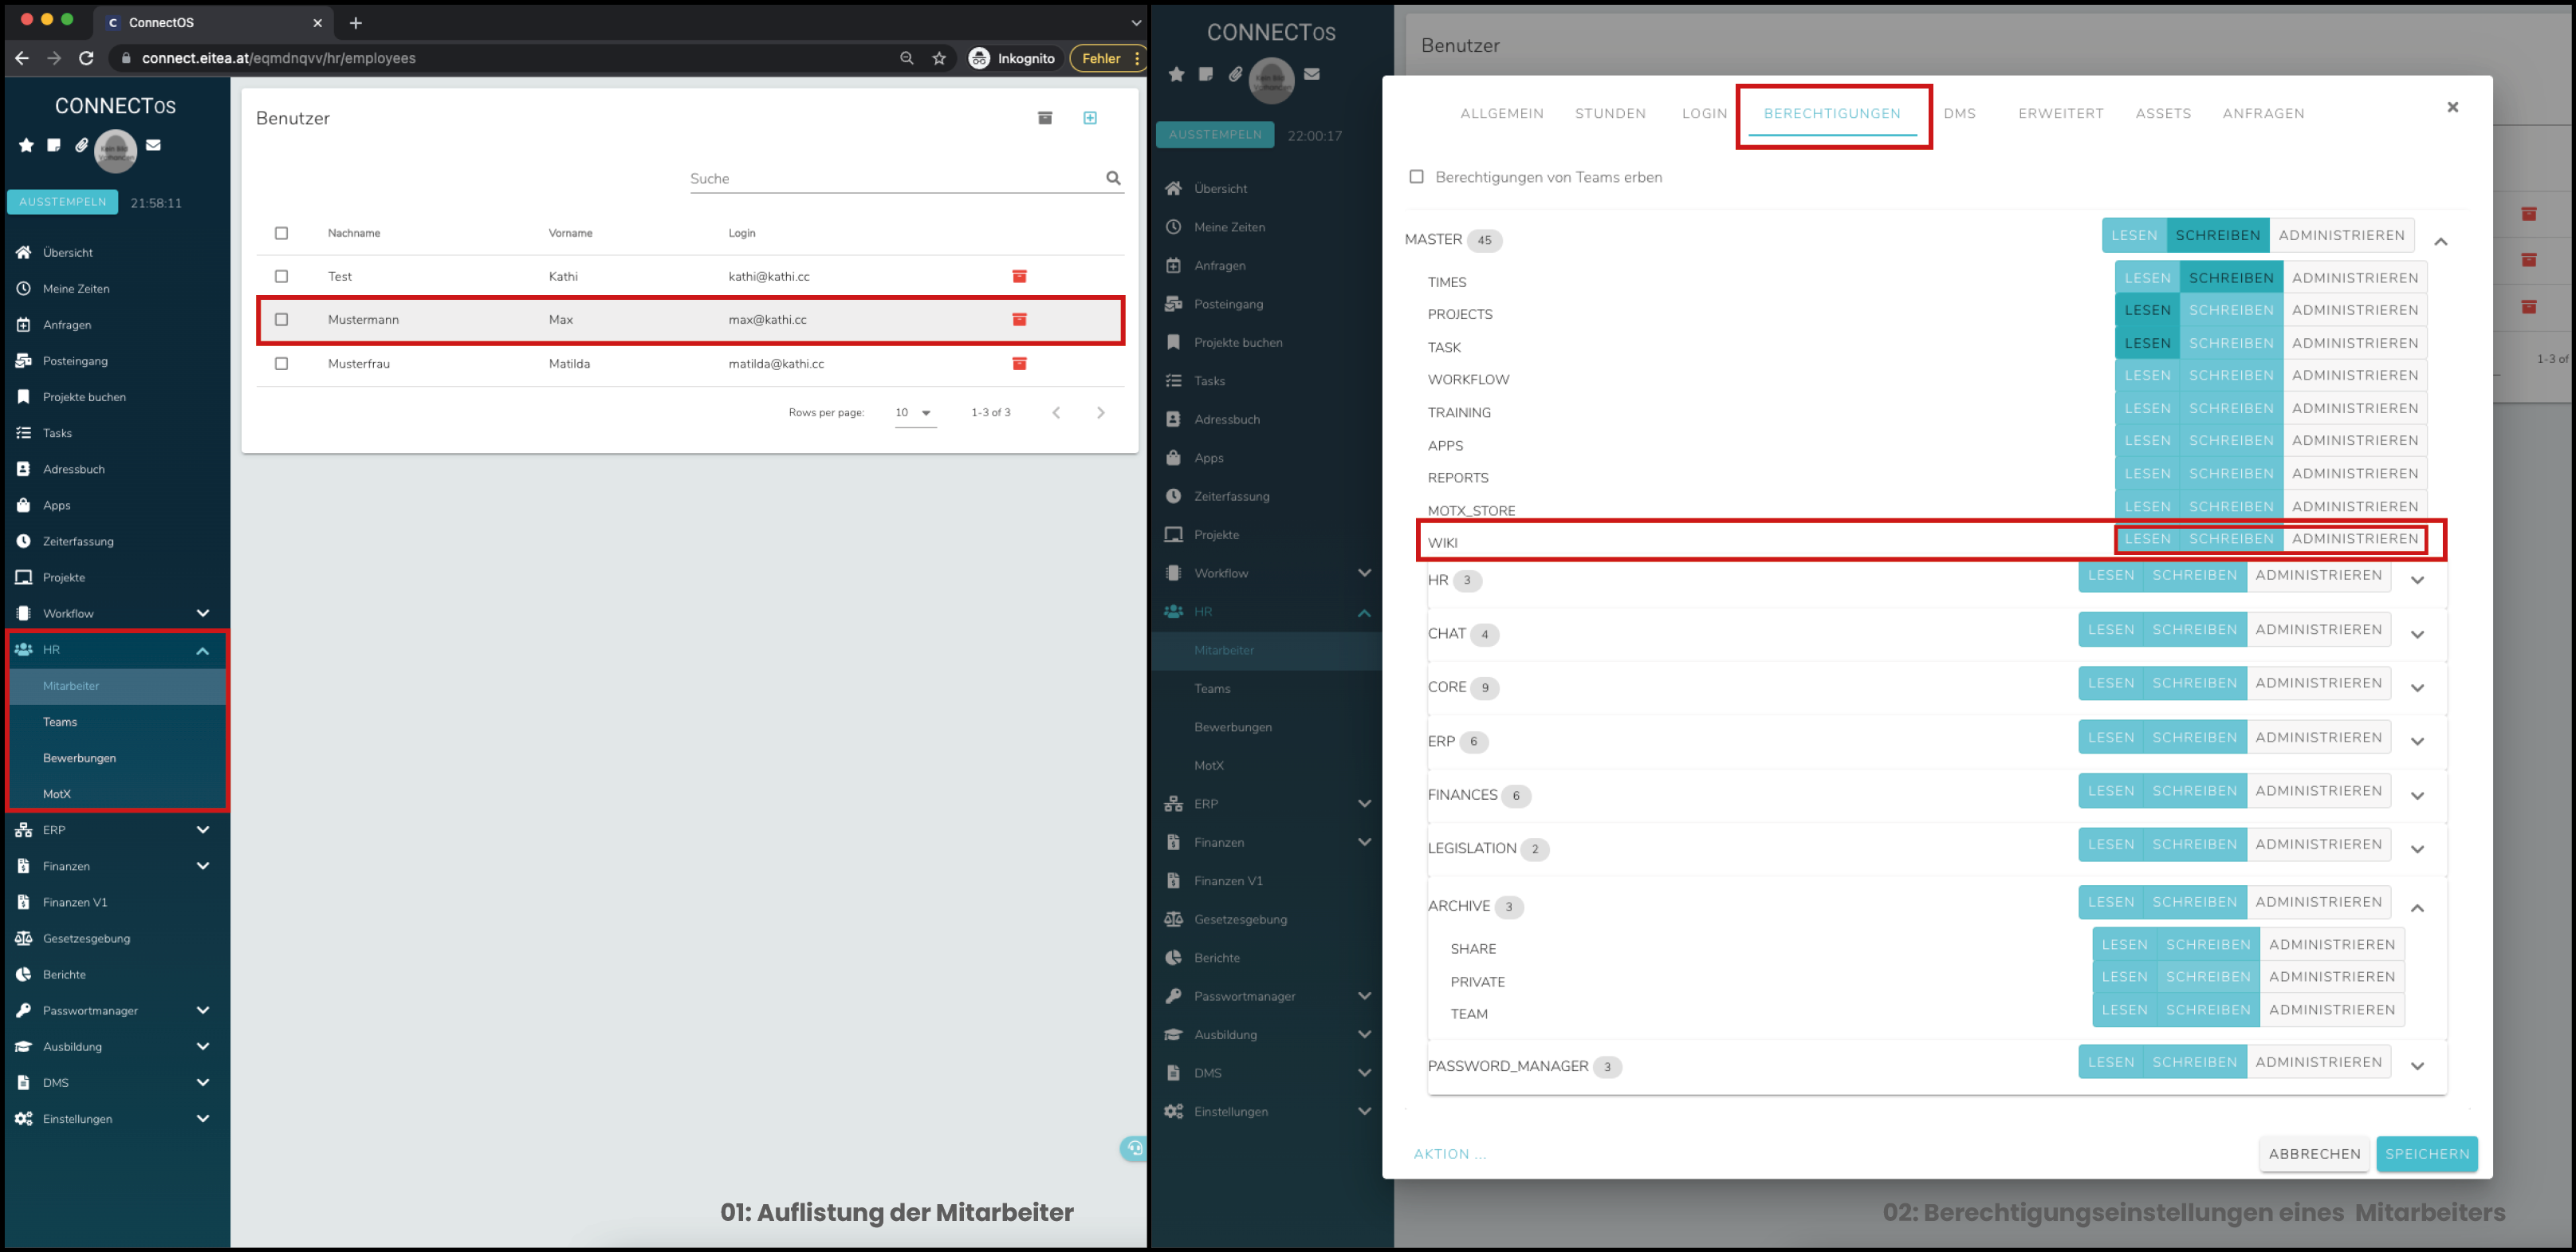
For an employee to have access to ConnectOS’ Wiki they have to be granted access first. In the menu bar left these options can be set in the category HR > employees. Choose the employee of interest and open the submenu AUTHORIZATION in the top menu bar of the opened tab. In those settings it can be defined to which company department and to what extend the employee has access to. Here can be differentiated between READ, WRITE and ADMINISTER. In between all the available modules the WIKI module can be found as well.
1. Where and how to create a Wiki-entry
ConnectOS’ Wiki can be found in the left menu bar under the category training. When opened, the first thing shown is the Wiki overview. From there a new Wiki entry can easily be created by simply clicking + in the menu bar in the top right corner.
In the newly opened window a list of options is available. It offer as much individuality as possible when creating a new entry. The first thing to consider is a name for the Wiki entry so it can be recognized and found when searched later on. With the help of tags the post can be categorized depending on its relevance for the different company departments or other categories. Such tag could be something like marketing, question, important, etc. Of course it is possible to assign multiple tags to an entry. So individual posts about a specific topic can be easily found.
1.
2.
2. text box options and appendix
Of course it is possible to write a text as a Wik entry. Therefore a text box is provided that offers many different settings like markup, color selection, code elements, and more. There is also the option to add an additional data file to the text. With you can add a Wiki link, with you can add an already uploaded document or with you can upload a document right away.
3. accessibility
Like with other modules in ConnectOS it is possible to define to what Wiki articles certain employees or teams have access to. By activating the option global visibility, the entry can be seen by everyone. Right underneath the global visibility option the option teams can be found, with which can be specified which team has access to this particular Wiki post. Of course more than just one team can be allowed access.
When all essential options are set, the Wiki entry can be saved by clicking CREATE.
3.
4.
4. Wiki overview and search options
By looking at the overview page of ConnectOS’ Wiki already a lot of information about its content can be gathered. It is shown how many pages and how many global pages exist and which articles were created or worked on last. In addition to that it can be seen at one glance how many entries are relevant for each individual team.
If you want to search for a specific post you can do that by using the input field in the upper menu bar – the so called fast search. If you want to search for a post only knowing a key word that is (a significant) part of an entry’s text, you can use the full-text search, which can also be found in the menu bar in the top right corner.
5. clipboard and belated editing
An other important function in ConnectOS that has great relevance (even though unrelated to the Wiki), is that can be found at the top of the left menu bar. It can be used to create new documents and save them in the clipboard of ConnectOS. For example, if you want to add a webcam video for better explanation to a Wiki-post after some time, you can do that by choosing an article and clicking edit in the top right. So the Wiki entry options can be opened again. From there the webcam video that is saved in the clipboard can be added to the article like it is shown above (step two). Of course it is possible to add a document from your clipboard when creating a new post too.
5.
6.
6. Wiki authority
For an employee to have access to ConnectOS’ Wiki they have to be granted access first. In the menu bar left these options can be set in the category HR > employees. Choose the employee of interest and open the submenu AUTHORIZATION in the top menu bar of the opened tab. In those settings it can be defined to which company department and to what extend the employee has access to. Here can be differentiated between READ, WRITE and ADMINISTER. In between all the available modules the WIKI module can be found as well.